

Canvas grid
The canvas has a grid, and new generations are placed on it. Duplicated layers offset along it, and moving objects keeps them aligned. Snap to grid is in the zoom control at the bottom of the canvas. The grid is hidden when you zoom out below 6%. Dragging images onto the canvas doesn’t align them to the grid yet.Canvas states
When nothing is selected, the canvas shows the workspace and toolbar. When a single object is selected, its Selected object panel opens on the left with the prompt, model, style, and parameters used to create it, and the Context panel opens on the right with generation and editing options for that object, grouped into Modify, Reuse, and Finalise. When multiple objects are selected, the context panel switches to batch actions. Object alignment options become available and apply to all selected objects at once.Creating content on the canvas
You can create content on the canvas in several ways: generate or edit images using the Prompt panel, use Create new actions from the toolbar or right-click menu, import existing images, or add text, shapes, comments, and frames directly to the canvas. The prompt panel is organized into two tabs: Create for generating new content and editing existing images, and Chat for agentic generation. Switch tabs to move between them, rather than the panel adapting to your selection.Canvas navigation and movement
The canvas supports freeform navigation across large projects. You can scroll, pan, and zoom to move around the workspace and focus on specific areas. Navigation tools and controls The canvas toolbar includes dedicated tools for navigation and selection:- Pointer tool: Used to select, move, and resize objects on the canvas.
- Hand tool: Used to move the canvas itself without changing selection. This tool is available in the toolbar and can also be temporarily activated by holding the space bar.
- Use your trackpad or mouse wheel to scroll across the canvas.
- Trackpad scrolling moves the canvas in any direction.
- Use the hand tool to click and drag the canvas when working in larger layouts.
- Use your trackpad or scroll wheel to zoom in and out.
- The zoom control in the top header displays the current zoom level.
- Opening the zoom menu provides preset options:
- Zoom in
- Zoom out
- Zoom to 50%
- Zoom to 100%
- Zoom to 200%
- Zoom to fit project (shows all content on the canvas)
- Zoom to fit selection (focuses the view on the currently selected objects, when available)
Context menus and shortcuts
Right-clicking provides quick access to common actions. On an empty canvas, the menu focuses on creating new content. On selected objects, the menu includes actions such as copy, duplicate, delete, export, and arrange.Canvas (right-click)
When you right-click on the canvas, you’ll see the “Create new” option at the top of the menu.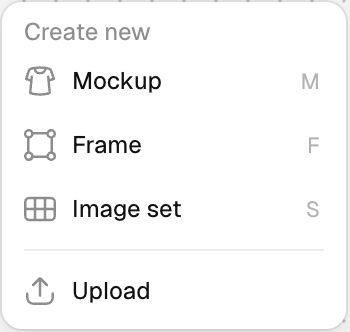
- Start generation directly at a specific location on the canvas
- Control placement without manually moving results afterward
- Quickly iterate in a chosen area (e.g., filling empty space or extending a layout)